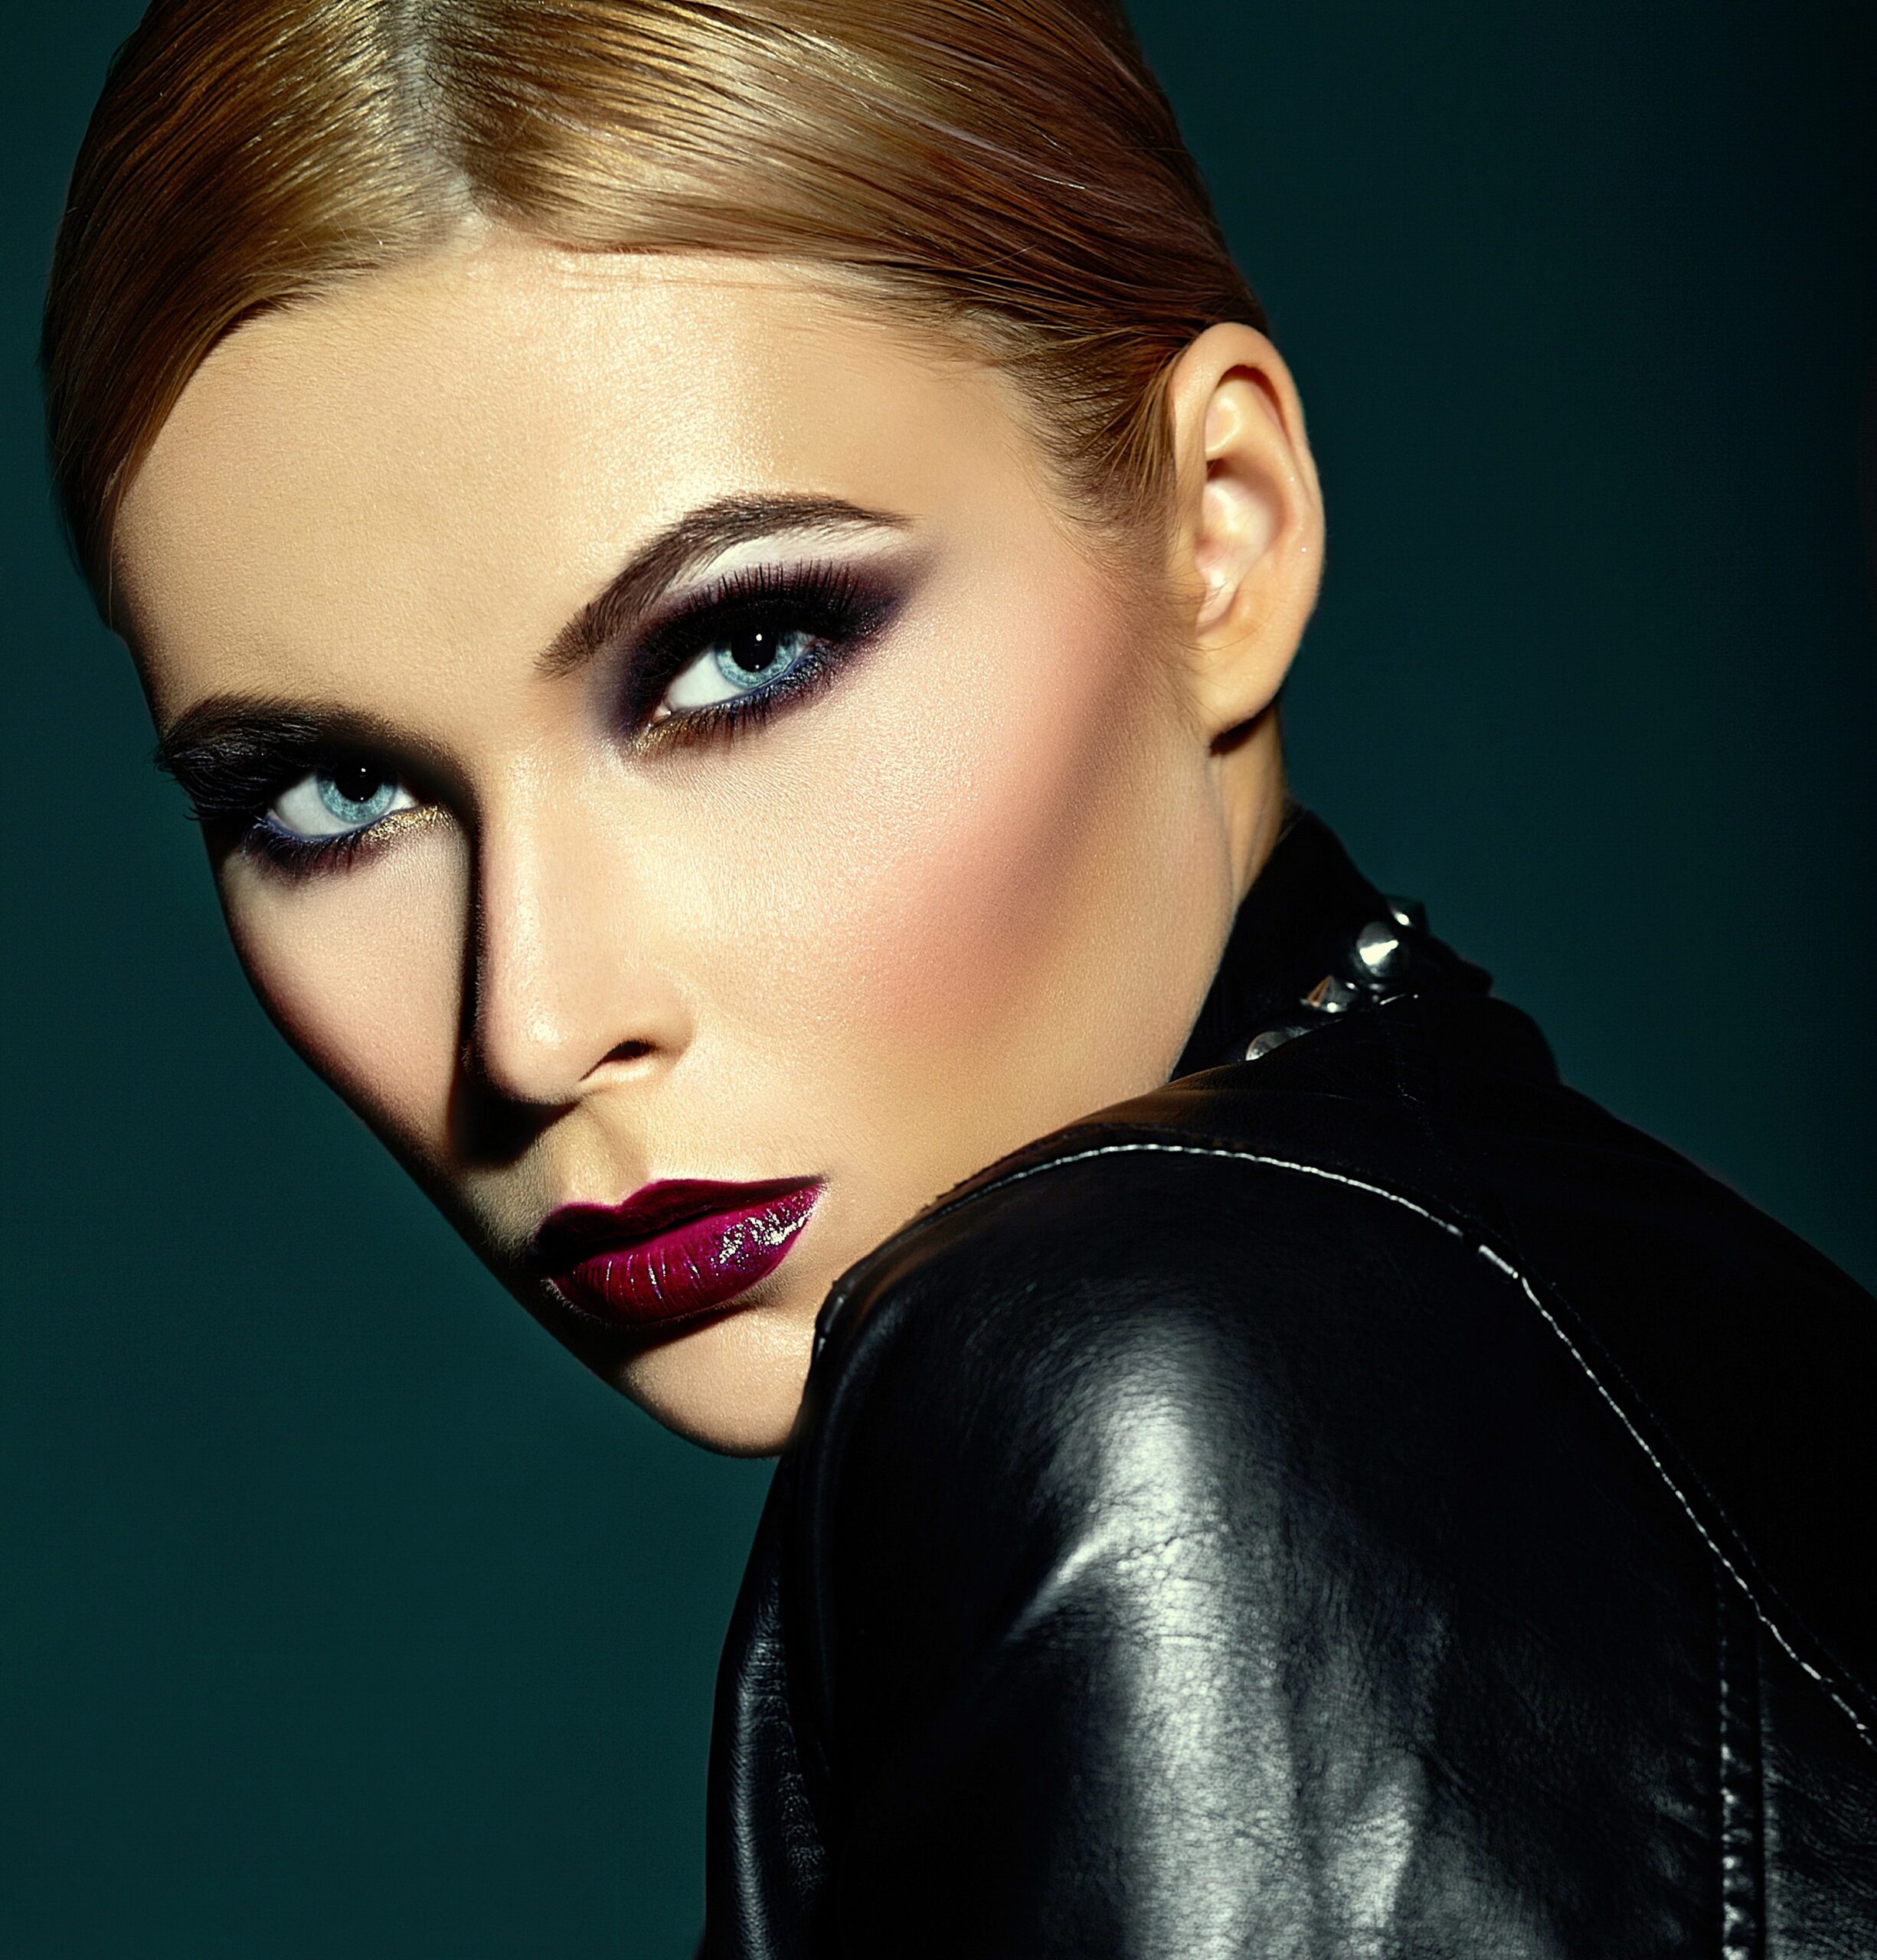
Hooded eyes have extra skin folding over the crease which can make classic eye looks like the smokey eye behave differently than on non-hooded lids. The goal of a smokey eye for hooded eyes is to create visible depth and drama while keeping the shadow visible when the eye is open. This guide breaks the look into simple, repeatable steps you can follow every time, explains brush choices, color placements, product textures that work best, and common mistakes to avoid. Follow this step-by-step routine and you’ll get a sultry, lived-in smokey eye that reads on hooded lids, lasts all night, and flatters your eye shape.
Tools and products you’ll need
Before we begin, gather the right tools and products. Brushes: a flat packing brush (shader), a small dense pencil brush, a fluffy tapered blending brush, a small crease/blending brush with a slightly narrow tip, and a clean fluff brush for diffusing edges. Extras: a clean angled brush for liner smudging and a small flat synthetic brush for applying shimmer. Makeup: an eye primer or long-wear concealer, an eyeshadow base (skin-tone), a matte transition shade (light to medium neutral), a deeper matte shade for the outer V and lower lashline (taupe, warm brown, or charcoal), a dark shade for the lash line (black, deep brown, or deep plum), one shimmer or metallic for the lid (champagne, bronze, or rose gold), eyeliner (gel, pencil, or liquid as you prefer), mascara, optional false lashes, and if you like, a setting spray and a tiny bit of face powder to catch fallout. Texture notes: matte shades are essential for building shape and depth; cream shadows can work but are best set with powder shadows to prevent transfer. Long-wear, pigmented powders work best on hooded lids because they hold shape and don’t disappear when the eye opens.
Prep: clean, prime, and set your lid
Start with clean, moisturized eyelids. If your lids get oily, use a lightweight eye balm and allow it to absorb. Apply an eye primer across the lid and up toward the brow bone. For hooded eyes you want the shadow to be visible when your eyes are open, so extend the primer slightly higher than your natural fold toward the brow bone—this creates a higher “canvas” for the shadow. If you don’t have primer, a long-wear concealer works fine; set it lightly with translucent powder or a skin-tone eyeshadow to prevent creasing. Tip: press the base with a flat brush rather than brushing to keep product from moving into your real fold.
Choose your smokey color story
Classic smokey eye palettes include neutral greys, taupes, browns and blacks; you can also do jewel tones like plum, navy, or emerald. For hooded eyes, choose at least three values: a light transition shade, a medium shade for shaping, and a deep shade for depth and lash-line work. If you want shimmer on the lid, pick a formula that’s pigmented but thin so it won’t cake in the fold. For beginners, warm brown or taupe smokeys are most forgiving and flatter many skin tones.
Step 1 — map your crease to where it’s visible (key hooded-eye trick)
Look straight ahead in the mirror with relaxed eyes. With a thin, soft pencil or a light matte shadow on a small brush, mark where your mobile lid ends and where shadow will still be visible when your eye is open. For hooded eyes that mark will be above (closer to) your natural crease. This visual mapping tells you where the “new crease” should sit so your shading appears when your eyes are open. Note: this is not creating a fake crease that looks unnatural; it’s merely extending the canvas so your work reads. Keep this point in mind as your upper limit for the transition shade.
Step 2 — lay down the transition shade slightly above your mapped crease
Using a fluffy tapered blending brush, pick up a light to medium matte neutral (warm beige, soft taupe). With light windshield-wiper and tiny circular motions, sweep the shade slightly above the mapped crease point and blend outward toward the tail of your brow. For hooded lids you must place the transition higher than you would for deep-set eyes this creates the illusion of a higher crease. Keep the pigment soft and diffused rather than a harsh line. Build slowly; it’s always easier to add product than remove it. Use a light hand and short strokes to avoid heavy pigment.
Step 3 — deepen the outer corner and create the shape
Swap to a small tapered blending brush and pick a medium-dark matte shade (warm brown, cool taupe depending on your color story). Focus this color on the outer third of the lid and blend into the outer V, working upward slightly toward the mapped crease point. For hooded eyes, think horizontal elongation: drag the color outwards toward the temple to lift the eye visually rather than concentrating heavy darkness on the central crease which will disappear when the eye opens. Keep the inner part of the lid lighter. Blend the outer edge gently so it feather-fades into the transition shade.
Step 4 — add depth lower and closer to the lashline
Take a dense pencil brush and a deeper matte shade (deep brown, charcoal, or blackened plum). Press this color along the upper lash line and slightly into the outer third of the lid, concentrating color closest to the lashes. This gives the illusion of thicker lash base and visible depth when the eye is open. Then lightly smudge this color into the outer lid area you defined earlier to create a seamless gradient from lash line to transition. If you want a softer look, use dark brown; for a dramatic smokey use charcoal or black, but blend extra carefully to avoid a harsh blotchy patch that can overpower a hooded lid.
Step 5 — refine the crease and keep visibility in mind
Take a clean small blending brush and very lightly diffuse the junction between the midtone and the deep shade, focusing on softening hard edges. For hooded eyes, the area visible with the eye open should show the smooth gradient so continually open your eyes, look straight ahead, and check visibility. If your deepest shadow is sitting under the fold and disappears, lift the placement slightly higher until it reads in the mirror with your eyes open. Avoid piling darkness directly in the natural crease because hooded skin will often cover and mute it.
Step 6 — add shimmer or metallic to the mobile lid (optional)
If you want a glam smokey, place a shimmer on the mobile lid. Use a flat synthetic brush or your fingertip for better payoff. Pat a thin shimmer in the center to inner lid, keeping it below your mapped crease so it is visible when eyes are open. For hooded lids choose a low-build shimmer (soft metallic or microshimmer) rather than chunky glitter to avoid product fallout settling into the crease. If applying cream shimmer, set it with a matching powder shimmer to prolong wear and avoid transfer.
Step 7 — sharpen the outer edge and lift the eye
To exaggerate the lift, use a small angled brush and your transition shade or a slightly darker matte to draw a subtle winged shape that follows your lower lash line angle, extending toward the tail of the eyebrow. Blend the tip but keep its direction sharp enough to create an upward lift. This visual extension tricks the eye into a lifted appearance and keeps the smokey from making the eye look heavy.
Step 8 — smoke the lower lashline correctly for hooded eyes
For hooded eyes you want the lower-lash smoke to anchor the look without closing the eye. Using the small pencil brush, run the midtone shade softly along the outer two-thirds of the lower lash line. Then take the deeper shade and concentrate it only right at the outer corner along the upper lash line and slightly onto the lower lash line for balance. Avoid heavy dark color along the whole lower lash line which can make the eye appear smaller. Instead, keep the darkest point at the outer corner, blending forward slightly for a graduated smoke.
Step 9 — tightline and define the lash base
Tightlining (lining the upper waterline) is a key trick for smokey eyes because it creates the illusion of fuller lashes without taking lid space. Use a waterproof gel or pencil liner to line the upper waterline, then softly smudge a small amount of the deep shadow over it to set and smoke it. For hooded eyes avoid heavy liquid liner on the full lid area; instead, either skinny liner at the very base of the lashes or a tightline will keep the lid space open. If you want a winged liner, keep it thin and short so it lifts rather than overwhelms.
Step 10 — blend, clean, and perfect the edges
Use a clean fluffy brush to diffuse any harsh lines and ensure a soft gradient from the deepest color up into the transition. If shimmer or fallout left a mess below the eye, sweep a tiny amount of translucent powder under the eye before you start, then dust it away at the end to remove fallout. For a crisp outer edge, place a card at an angle from cheekbone to outer brow and blend up to it, or use a small bit of concealer on a flat brush to carve the edge this brightens and sharpens the tail without needing heavy liner.
Step 11 — mascara and lashes (finishing moves)
Curl lashes and apply a lengthening and volumizing mascara. Focus on the roots and outer lashes to open the eye. For extra impact, apply individual lashes or a natural-looking strip concentrated on the outer half of the lash line to keep the eye lifted. Avoid full heavy strips that cover the entire lid because they can push the lid down visually on hooded eyes. Trim the band and apply slightly above the lash line if needed so the lashes blend and lift.
Step 12 — set and ensure longevity
Set the look by lightly misting setting spray with eyes closed and a few seconds later opening. A long-wear primer and waterproof pencils will help prevent creasing, especially on hooded lids prone to transfer. If you have oily lids, use a light dusting of translucent powder on the upper lid (very sparingly) before eyeshadow to increase wear time. When using creams, always layer with powders to avoid transfer.
Troubleshooting: common problems and fixes
Problem: shadow disappears when the eye is open. Fix: raise placement of transition and crease colors higher so they sit on visible lid when eyes are open; use your mapped crease as a guide. Problem: heaviness/makeup looks droopy. Fix: concentrate the deepest pigment at the outer corner and extend outward rather than packing darkness in the center of the lid; soften the lower lash line. Problem: fallout makes under-eye dark. Fix: dust translucent powder under the eye before starting, then clean away with a fluffy brush; finish with concealer. Problem: liner creases on hooded lids. Fix: tightline instead of heavy liner on the mobile lid and use waterproof formulas; set pencil liner with powder shadow.
Quick variations for different occasions
Soft daytime smokey: use warm browns and taupes, minimal shimmer, single sweep of smudge-soft liner, natural lashes. Night/glam smokey: use charcoal or black for depth, a denser shimmer on the lid, mascara + outer-half falsies, and a slightly more extended outer wing. Color pop smokey: replace the lid shimmer or midtone with a jewel tone (emerald, navy, plum) while keeping the outer corner neutral brown to anchor the look. Graphic smokey: keep the general placement but sharpen the outer edge and add a thin colored liner above the dark shadow for a modern twist.
Makeup removal and skin care after heavy eye makeup
Remove makeup gently to avoid tugging on delicate hooded skin. Use an oil-based makeup remover or cleansing balm to dissolve mascara and eye makeup first, then follow with a gentle cleanser. For lower lashline staining use a cotton swab soaked in micellar water. After cleansing, apply a nourishing eye cream with peptides or hyaluronic acid to hydrate and repair the thin eyelid skin. Regular hydration and gentle exfoliation around the eye area (very mild AHA/BHA products used sparingly and away from the immediate lash line) help maintain even texture for easier makeup application.
Pro tips and professional hacks
Work in thin layers and build; hooded lids punish heavy, sudden pigment. Always check the look with your eyes open this is the single most important step for hooded eye makeup. Use matte shades to sculpt and shimmery shades economically to highlight. Angle your blending motions slightly upward and outward to emphasize lift. For oily lids, use a powder finish under the shadows; prime with a thin layer of translucent powder on the primer for extra grip. If you have asymmetry, place your outer wing slightly longer on the smaller eye to visually balance both. Consider lash lifts they open the eye and make shadow placement simpler.
Product and shade recommendations (beginner to pro)
Primer: Urban Decay Eyeshadow Primer Potion, NARS Pro-Prime Smudge Proof Eyeshadow Base, or a drugstore option like e.l.f. Primer. Transition shades: light warm tan or soft caramel matte. Medium shading: taupe brown or warm sienna matte. Deep shades: deep espresso brown, slate grey, or blackened plum. Shimmers: soft champagne, warm bronze, rose gold, or metallic taupe. Liner: waterproof gel or creamy pencil like MAC Fluidline or NYX Epic Ink. Mascara: lengthening + volumizing mix. Brushes: Sigma E25 (fluffy), MAC 217 (blending), Zoeva 230 (precise blending), a pencil brush like MAC 219 for lower lash smokes.
Step-by-step quick checklist for easy reference
-
Prep: prime and set lid above natural fold. 2. Map where shadow must be visible with eyes open. 3. Apply transition shade slightly above mapped crease. 4. Deepen outer third with medium-dark matte while extending outward. 5. Press deepest shade along lash base and outer lid. 6. Add shimmer to the mobile lid below mapped crease if desired. 7. Smudge lower lashline with midtone and concentrate darkest shade at outer corner. 8. Tightline and softly smudge liner. 9. Blend edges and clean up fallout. 10. Curl, mascara, add outer half lashes if desired, set with spray.
Frequently asked questions (FAQs)
Q: Can I do a smokey eye if my hooded skin is mature and crepey? A: Yes, use thinner, buttery formulas, avoid heavy powders that settle in fine lines, and focus on tightlining, outer lash emphasis, and lifted wings. Q: Do false lashes always help? A: Not always. Outer-half natural lashes are often more flattering than heavy full strips on hooded lids. Q: Can I use cream shadows? A: Yes, but set them with powder shadow to avoid transfer and creasing. Q: How long before the event should I do my eyes? A: Do your smokey eye first, then base and face makeup this allows you to clean fallout before foundation. Q: How do I make the look last all night? A: Prime, use long-wear pigments, set cream products with powders, choose waterproof gels/pencils for liner, and mist with setting spray.
Mastering a smokey eye for hooded eyes is about placement, patience, and checking your work with eyes open. Small adjustments in where you place shadows and how you blend make big differences. Start with neutral tones and practice the mapped crease technique; once comfortable, experiment with different colors and intensities. Makeup is creative and personal this look should make you feel confident and empowered. Keep practicing, and soon the step-by-step will become second nature.